How to upgrade Enterprise Edition upgraded Pleasanter (ver. 1.4.8 or later)
Overview
This section explains the procedure for upgrading Pleasanter in an environment using the Enterprise Edition. Please be sure to follow these instructions, especially if you have expanded columns.
Cautions
- Be sure to back up your database before upgrading.
Pleasanter User Manual - FAQ: Backup, Restore - Be sure to use the license file currently in use. If you have expanded columns, running CodeDefiner with an expired license file will delete the expanded columns and prevent you from accessing the data you entered.
Prerequisites
- This procedure assumes that you have upgraded Pleasanter to the Enterprise Edition.
Operation Procedure
- Back up the license file
- Complete the upgrade process up to "Preparing Pleasanter"
- Store the license file
- Complete the upgrade process from "Running CodeDefiner" onwards
- Confirm the upgrade
Operation Procedure
For this procedure, please refer to the "Upgrade (Installer)" section of our online manual.
Pleasanter User Manual - Upgrade (Installer)
1. Back up the license file
Back up the license file from your environment. The file should be stored in the following location:
The above paths are for installations following the instructions in our online manual. Please adjust accordingly for your environment.
2. Complete the upgrade process up to "4. Preparing Pleasanter"
Follow the upgrade process in our online manual up to step 4 "Preparing Pleasanter".
*For Azure App Service environments, complete the upgrade process up to step 4.3 "Reconfiguring Parameters," in our online manual.
3. Store the License File
Overwrite and copy the license file backed up in step 1 to the following folders depending on your environment.
The above path is for installations following the instructions in our online manual. Please adjust accordingly depending on your environment.
You can also use the "Implem.License.dll" included in the license pack as the license file to be stored. In that case, please make sure it is the license file for your current contract.
4. Perform the upgrade procedure from "5. Run CodeDefiner" onward.
Perform the upgrade procedure from step 5, "Run CodeDefiner," onward, according to our online manual.
*For Azure App Service environments, perform the upgrade procedure from step 4.4, "Deploying the Application," onward, in our online manual.
If a reduction in the number of columns used in column extensions occurs during step 5, "Run CodeDefiner", the error message "<ERROR> Configurator.CheckColumnsShrinkage: The columns will be shrinked." will be displayed, the process will end, and CodeDefiner will not run. If an error occurs, the columns to be reduced will be displayed as shown below. Please double-check that the parameter file and license have been applied correctly.
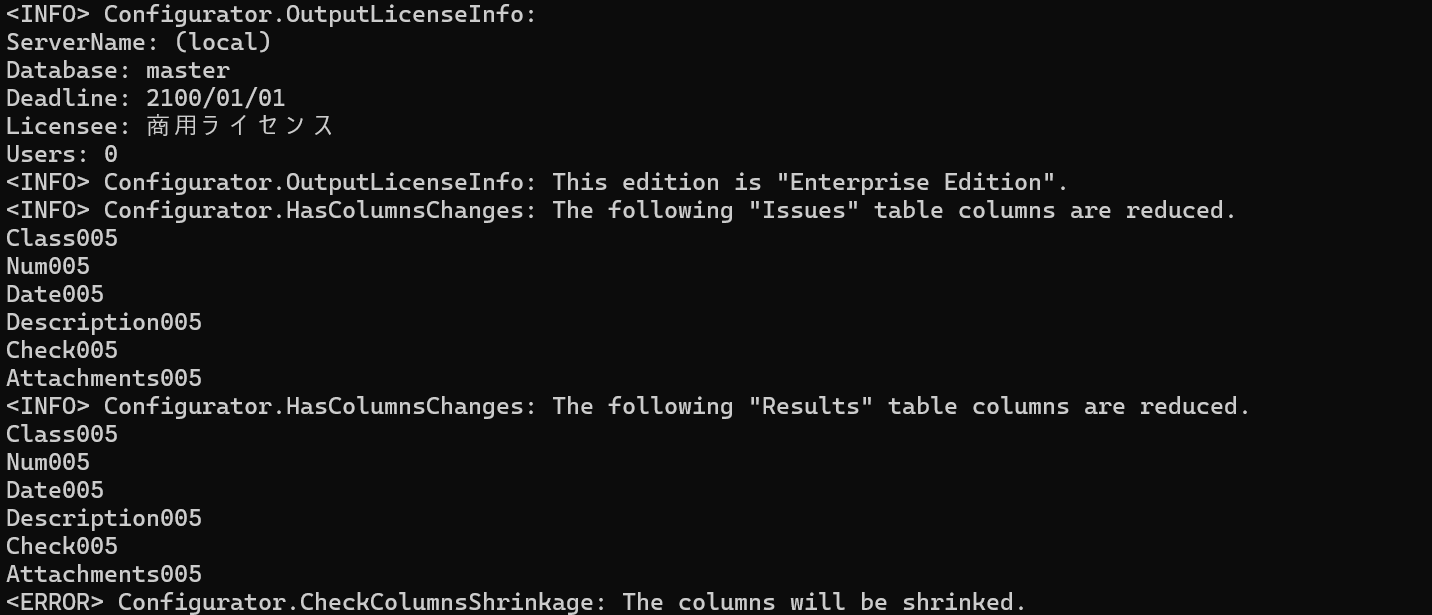
If you want to allow column reduction, execute the command executed in Step 5, "Run CodeDefiner", with the argument "/f".
*Please execute the above command according to your environment.
5. Check for version upgrade
-
Log in to Pleasanter and check the following from "Help" - "Version" in the navigation menu.
- The license is set to "Commercial License".
- The license expiration date is correct (for a license valid until the end of February, it will be displayed as 3/1).
- The user is correct.
- The version is correct.
-
If items have been expanded, check the following.
- Open any table, click [Manage] - [Manage Table] in the navigation menu, and in the "Editor" tab, make sure the extended columns (Class 001, Value 001, etc.) appear in the option list.
- Open the editing screen for the table in which you've set the extended columns, and make sure all columns are displayed.