Install Pleasanter on Windows
Overview
This description shows the steps to build the operating environment of Pleasanter in the environment shown below.
| Target | Environment/Version |
|---|---|
| OS | Windows Server |
| DB | SQL Server |
| Web server | IIS |
| Platform | .NET 10 (when using Pleasanter 1.5 or later) .NET 8 (when using Pleasanter 1.4) |
| Pleasanter | Pleasanter 1.4 |
Cautions
- When installing ver1.4.6 or later, if you run CodeDefiner without specifying arguments, it is set up with the language set to English and the time zone set to UTC. Specify the language and the time zone as necessary.
- When installing ver1.4.5 or earlier, the CodeDefiner command used for the first installation is different. Refer to the following page.
About the CodeDefiner procedure when installing for the first time from version 1.4.6 - MySQL can be used with ver1.4.9.0 and later. Pleasanter earlier than ver1.4.9.0 does not support MySQL.
- To use MySQL in a configuration where the web server and the DB server are separated, refer to "Configure MySQL to be used in a configuration where the web server and DB server are separated (Ver.1.4.18.0 and later)" or "Configure the Web Server and DB Server to Use MySQL Separately (Ver.1.4.17.1 and earlier)".
Procedure
The construction procedure is as follows.
1. Preparation
1. Setup Pleasanter
1. Run CodeDefiner
1. Set up IIS
1. Check Pleasanter's operating status
1. Preparation
- Prepare in advance according to the environment in which you want to install Pleasanter
Install Pleasanter on Windows Server 2022
Install Pleasanter on Windows Server 2019
Install Pleasanter on Windows Server 2016
Install Pleasanter on Windows 11
2. Setup Pleasanter
-
Download the latest version of Pleasanter from the GitHub release notes.
-
Unzip the downloaded zip file and place it on your server. Create a "web" folder on the C drive and place the "Pleasanter" folder there.
"C:\web\pleasanter\Implem.Pleasanter"
"C:\web\pleasanter\Implem.CodeDefiner"
"C:\web\pleasanter\Tools"

-
Set connection information to the database. Set "C:\web\pleasanter\Implem.Pleasanter\App_Data\Parameters\Rds.json" as follows.
No Property name Value 1 Dbms "SQLServer" 2 SaConnectionString "Server=(local);Database=master;UID=sa;PWD=XXX;Connection Timeout=30;"
*Please enter the password for the SQL Server sa account as the PWD value.3 OwnerConnectionString "Server=(local);Database=#ServiceName#;UID=#ServiceName#_Owner;PWD=XXX;Connection Timeout=30;"*Please enter any password as the PWD value. 4 UserConnectionString "Server=(local);Database=#ServiceName#;UID=#ServiceName#_User;PWD=XXX;Connection Timeout=30;"*Please enter any password as the PWD value.
{
    "Dbms": "SQLServer",
    "Provider": "Local",
    "SaConnectionString": "Server=(local);Database=master;UID=sa;PWD=SetSaPWD;Connection Timeout=30;",
    "OwnerConnectionString": "Server=(local);Database=#ServiceName#;UID=#ServiceName#_Owner;PWD=SetAdminsPWD;Connection Timeout=30;",
    "UserConnectionString": "Server=(local);Database=#ServiceName#;UID=#ServiceName#_User;PWD=SetUsersPWD;Connection Timeout=30;",
    "SqlCommandTimeOut": 0,
    "MinimumTime": 3,
    "DeadlockRetryCount": 4,
    "DeadlockRetryInterval": 1000,
    "DisableIndexChangeDetection": true
}
If you use SQL Server without a TLS server certificate as the database, such as in a development environment, add TrustServerCertificate=True; to the end of each connection string.
RDS.json (excerpt of the relevant part)
    "SaConnectionString": "Server=(local);Database=master;UID=sa;PWD=<password for the SQL Server sa account>;Connection Timeout=30;TrustServerCertificate=true;",
    "OwnerConnectionString": "Server=(local);Database=#ServiceName#;UID=#ServiceName#_Owner;PWD=<any password>;Connection Timeout=30;TrustServerCertificate=true;",
    "UserConnectionString": "Server=(local);Database=#ServiceName#;UID=#ServiceName#_User;PWD=<any password>;Connection Timeout=30;TrustServerCertificate=true;",
For details, see Notes on Connection Strings When Using SQL Server as the Database in Pleasanter.
3. Run CodeDefiner
- Start Command Prompt or PowerShell and execute the following command.
4. Set up IIS
-
Open the "Tools" menu of "Server Manager" and start "Internet Information Services (IIS) Manager".
-
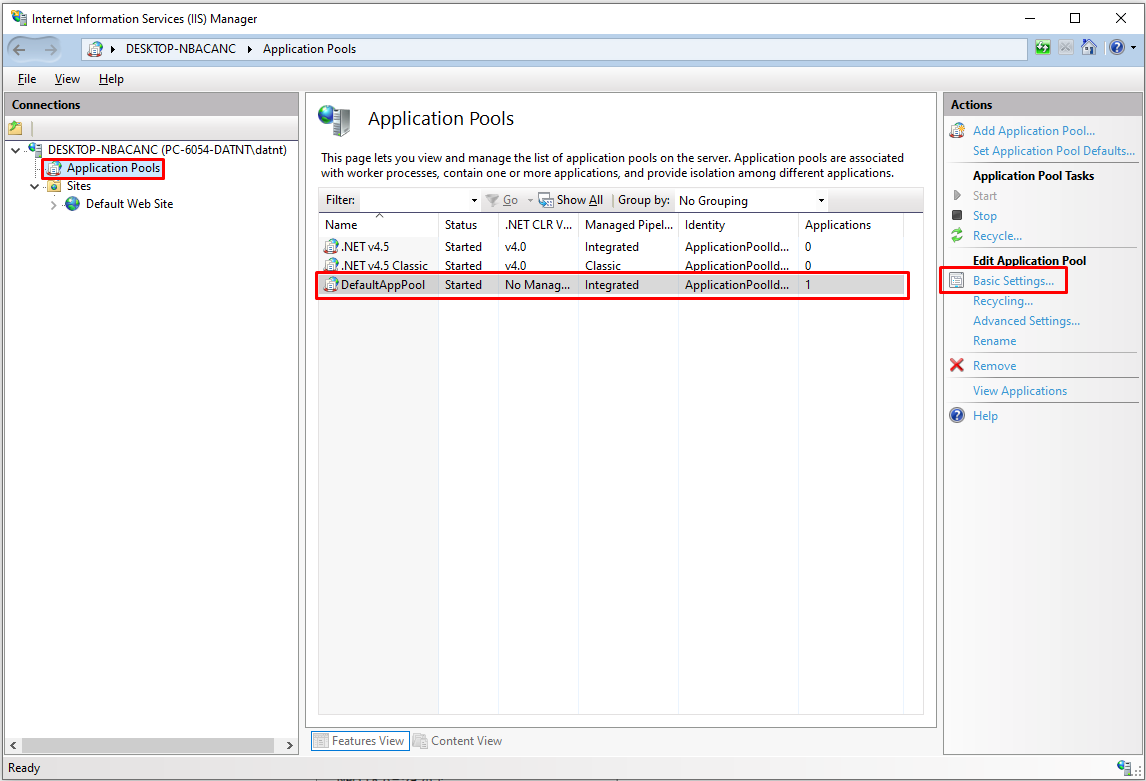
Select "DefaultAppPool" under "Application Pools" and click "Basic Settings".
-
Change the Net CLR version to "No Managed Code".

-
From the left pane, select Site - "Default Web Site" and click "Advanced Settings" on the right pane.

-
Enter the physical path: "C:\web\pleasanter\Implem.Pleasanter".

-
From the left pane, select Site - "Default Web Site" and click "Restart" on the right pane to restart IIS.

-
After restarting, click "Browse *.80(http)" in the right pane to start Pleasanter.

5. Check Pleasanter's operating status
-
Enter "Login ID: Administrator" and "Initial Password: Pleasanter" on the Pleasanter login screen, and click the "Login" button.

-
After logging in, you will be asked to change the password for the "Administrator" user. Enter your desired password and click the "Change" button.

Supported Versions
| Supported versions | Body |
|---|---|
| 1.4.9.0 and later | Supports MySQL |
| 1.4.18.0 and later | Added the ability to specify a host other than localhost (the same server as the DB) as the source host for connecting to the MySQL DB |
| 1.5.0.0 and later | Supports Windows Server 2025, .NET 10, SQL Server 2025, and PostgreSQL 18 |